Description
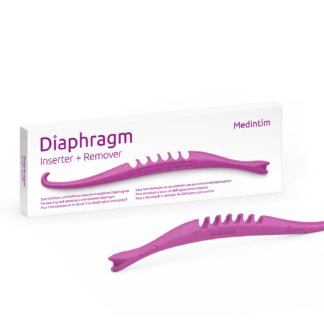
Innsetningarstjaka fyrir Caya hettuna. Gerir þér auðveldara fyrir að setja upp og fjarlægja Caya hettuna. Hentar einnig fyrir hettur í mismunandi stærðum. Með rúnaða endanum geturðu fjarlægt hettuna þó þú náir ekki til hennar með eigin fingrum. Engar hvassar brúnir eru á stjökunni og lögunin er byggð á langri reynslu af praktískum verkfærum sem þessu.
The Diaphragm Inserter + Remover makes it easier to insert and remove the Caya® or Singa® diaphragm. Diaphragms in different sizes can be easily hooked up and inserted. With the curved side, removing the diaphragm is possible even if you can’t reach it well with your own fingers. The inserter has no sharp edges and its shape is based on established, long-term experience with this practical tool.
Notkun-Application
Fyrsta skref – Step 1
Innsetningarstjakan hefur tvo ólíka enda. Endi merktur 1 er ætlaður til að setja hettuna upp, endi merktur 2 er ætlaður til að fjarlægja hettuna.
The insertion rod has two different sides. Side 1 is for inserting a diaphragm and side 2 is for removing it.

Annað skref – Step 2
Haldið innsetningarstjökunni með annarri hendi. Með hinni hendinni, haldið um hettuna á upphleyptu punktunum svo brjótist upp á hana. Krækið enda hettunnar fyrst upp á enda merktan 1 og hinn endann upp á eitt af hökunum sem eru á miðju stjökunnar.
Hold the insertion rod with one hand. With the other hand, hold the diaphragm by the grip dimples so that it folds up. Now, the diaphragm is first mounted onto side 1 and then hooked with the other side into one of the notches (centre of the rod).

Þriðja skref – Step 3
Hettan ætti nú að vera samanbrotin á lengdina og fest við innsetningarstjökuna og ytri hluti hettunnar snýr niður að stjökunni.
The diaphragm should now be folded lengthwise and attached to the insertion rod with the diaphragm membrane facing the rod.

Fjórða skref – Step 4
Setjið um það bil 4 ml af hettugeli á samanbrotna hettuna.
Apply approx. 4 ml of the diaphragm gel onto the folded diaphragm.

Fimmta skref – Step 5
Stingið stjökunni með hettunni á eins langt og hægt er inn í aftari hluta legganga undir leghálsi. Meira en helmingur stjökunnar með hettunni á er nú inni í leggöngum og hettan sést ekki lengur fyrir utan leggangaopið.
Insert the insertion rod with the diaphragm as far as possible into the posterior vaginal vault. More than half of the insertion rod with the diaphragm is now inserted and the diaphragm is no longer visible from the outside.

Sjötta skref – Step 6
Snúið upp á innsetningarstjökuna svo hettan losni af henni. Dragið stjökuna varlega út.
Rotate the insertion rod to allow the diaphragm to detach itself from the insertion rod. Carefully pull out the insertion rod.

Sjöunda skref – Step 7
Ef nauðsynlegt er, þreifið þá eftir hettunni til að vera viss um að hún sé yfir leghálsinum og liggi fyrir aftan og ofan lífbeinið
If necessary, feel to check that the diaphragm is covering the cervix and lying in the niche at the front of the pubic bone.

Áttunda skref – Step 8
Til að fjarlægja hettuna, setjið stjökuna með enda merktan 2 fáeina sentimetra inn í leggöngin. Færið enda hennar uppfyrir fremri kant hettunnar og krækið í hana. Þetta gerir þér kleift að fjarlægja hettuna úr leggöngunum.
To remove the diaphragm, insert the insertion rod with the hook (side 2) a few centimetres into the vagina. Guide the hook of the rod behind the front edge of the diaphragm and hook it on. This will allow you to remove the diaphragm from the vagina.


Efni – Material
Innsetningarstjaka fyrir Caya hettuna er úr ABS plasti.
The Diaphragm Inserter + Remover is made of plastic (ABS).
Hreinsun – Cleaning
Innsetningarstjöku fyrir Caya hettuna ætti að hreinsa með sápu og vatni eftir hverja notkun og þurrka vel. Það þarf ekki að sótthreinsa eða sjóða hana.
The Diahragm Inserter + Remover should be cleaned with soap and water after each use and dried thoroughly. It does not need to be disinfected or boiled.


